Sales: 1.888.611.2288 | Support: 1.888.826.2288
Alternate Methods to Install, Uninstall, and Upgrade the Express Client
Technical Note 2021Last Reviewed 14-Aug-2015
Applies To
Express Software Manager version 8.0 and higher
Summary
There may be cases where you do not want to or cannot install the Express Client to machines from the Administrative Console (for example, if you have machines that are not connected to the network). This technical note describes: how to install, upgrade, and uninstall the client manually; the logic and syntax required to install, upgrade, or uninstall the client via a batch file or script; and, the requirements to deploy the client via group policy.
Note: The information in this technical note supersedes the information in the Express Software Manager Help topic entitled "How to install the Express Client manually."
A. How to install the Express Client manually
\Program Files\Express Metrix\Administrative Console\ClientInstallPackage
Once you locate the .msi file, do the following:
- Copy the ClientInstallPackage folder to a shared location where the Setup program will run.
- Run the Express software manager client.msi file as an administrator.
- Enter the URL of the Express Access Point to which the client will report. The format for the Access Point URL is:
http://<access-point-machine-name>/expresssoftwaremanagerap/clientservices.asmx - Select Complete and install the client.
B. How to uninstall the Express Client manually
msiexec /x {04F73471-157F-4F63-A2AD-50C1BBEECD66}
If you want this run silently, the command is:
msiexec /q /x {04F73471-157F-4F63-A2AD-50C1BBEECD66}
Note: You must have local administrative rights in order to uninstall the Express client. Typically, a domain administrator has local administrator rights on all computers.C. How to upgrade the Express Client manually
D. How to install the Express Client via a batch file or script
- Copy the ClientInstallPackage folder to a shared location where the installation will run.
Note: You must have local administrative rights in order to install the Express client. Typically, a domain administrator has local administrator rights on all computers. - Create a batch file or script with the appropriate client installation syntax. The following is the syntax to use followed by an example. Note that the entire syntax consists of one long command typed on one line; do not enter any line breaks.
Syntax for batch file or script:
msiexec.exe -i "<folder-containing-client-msi-file>\express software manager client.msi" /qn ESMWEBSERVICE=http://<access-point-machine>/ExpressSoftwareManagerAP/clientservices.asmxExample batch file or script syntax:msiexec.exe -i "\\myserver\myshare\express_client\express software manager client.msi" /qn ESMWEBSERVICE=http://myiisbox/ExpressSoftwareManagerAP/clientservices.asmxwhere myiisbox is the name of the Express Access Point machine and http://myiisbox/ExpressSoftwareManagerAP/clientservices.asmx is the Express Access Point URL.
E. How to uninstall the Express Client via a batch file or script
msiexec /q /x {04F73471-157F-4F63-A2AD-50C1BBEECD66}
Note: You must have local administrative rights in order to uninstall the Express client. Typically, a domain administrator has local administrator rights on all computers.F. How to upgrade the Express Client via a batch file or script
(64-bit Windows)
HKEY_LOCAL_MACHINE\SOFTWARE\Wow6432Node\Microsoft\Windows\CurrentVersion\Uninstall\{04F73471-157F-4F63-A2AD-50C1BBEECD66}
(32-bit Windows)
HKEY_LOCAL_MACHINE\SOFTWARE\Microsoft\Windows\CurrentVersion\Uninstall\{04F73471-157F-4F63-A2AD-50C1BBEECD66}
folder in the Windows Registry. A script which uses the Windows Scripting Host will allow you to make this registry check, then upgrade the client only if there is a newer version available.
G. Express Client deployment requirements via Windows Group Policy
A transform file for the deployment of the Express Client via Windows Group Policy can be created using a Windows Installer package editor such as Orca:
http://support.microsoft.com/kb/255905
Note: Express Metrix does not have expertise in the deployment of Windows Installer packages via Windows Group Policy. Therefore, Express Metrix can provide neither instruction nor support for this deployment option. Express Metrix can, however, create a transform file at a customer's request. To request a transform file, e-mail Technical Support. You must include your Access Point URL with your transform file request. The following is an example of the steps required to create a transform file using Orca for use in the deployment of the Express Client via Windows Group Policy:
- Once you have Orca installed and launched, click File, click Open, and browse to the Express Software Manager Client.msi file. This file is in the client sub-folder to wherever you extracted the Express installation files. By default, the folder is \Documents and Settings\<user>\Local Settings\Temp\esm800\ESM\Client.
- Once you have browsed to the Express Software Manager Client.msi file, click Transform and then click New Transform.
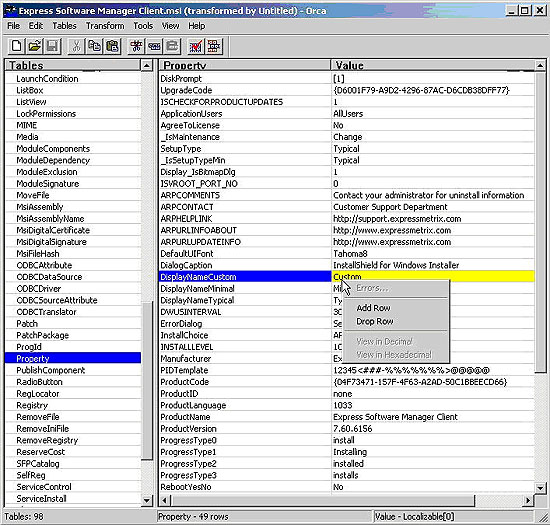
- On the left panel entitled Tables, select Property. On the right panel, right-click on any entry and click Add Row:
- To the right of 'Property' in the Add Row window, type ESMWEBSERVICE (all in uppercase).
- Press Enter or click on Value to type in your Access Point URL:
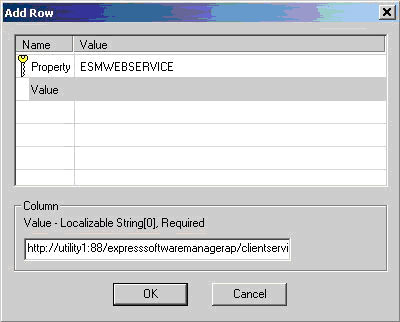
Note: Please be sure to enter the entire URL, for example: http://utility1:88/expresssoftwaremanagerap/clientservices.asmx - Click OK.
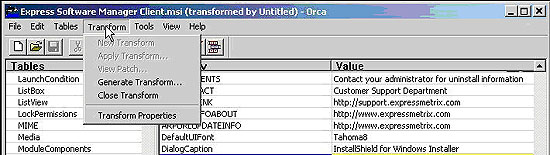
- To save your transform file, click Transform, click Generate Transform�, and save your Transform file,
Related Technical Notes
| 2000 | Express Software Manager Technical Notes |
Click here for a printable version of this tech note.